This is the place where I store the words when I surfing. Share with u.
这里放着我在网上看到的文章,和你一起分享。
Thursday, December 07, 2017
Tuesday, November 28, 2017
When VueJS Can't Help You
When VueJS Can't Help You
Vue’s beef with the
No mounting to the
Managing the

Scenario #2: Managing

If you want to build a web page with JavaScript, VueJS can do one helluva job on it. But there’s a condition: it only works on parts of the page where it has unhampered control. Any part that might be interfered with by other scripts or plugins is a no-go for Vue.
This means the
head and body tags are Vue-free zones. It’s a real bummer if you wanted Vue to manage a class on the body, to take one example.But while Vue can’t directly manage the
head or body tags, it can still help you to manage them through other means.Vue’s beef with the head and body tags
Why is Vue picky about where it works?
Vue optimises page rendering through use of a virtual DOM. This is a JavaScript representation of the “real” DOM that Vue keeps in memory. DOM updates are often slow, so changes are made first to the virtual DOM, allowing Vue to optimise how it updates the real DOM through batching etc.
This system would be undermined if some third party were to make changes to the DOM without Vue’s knowledge causing a mismatch between the real DOM and the virtual DOM.
For this reason Vue will not attempt to control the whole page, but only a part of the page where it knows it will have unhampered control.
The mount element
The first thing we usually do in a Vue project is to give Vue a mount element in the configuration object via the
el property:new Vue({
el: '#app'
});
This tells Vue where we’ve set aside part of the page that it can have to itself. Vue will have dominion over this element and all of it’s children. But it is unable to affect any element outside of the mount element, be it sibling or ancestor:
<head>
  <!--Vue has no power here!-->
</head>
<body>
  <!--Vue has no power here!-->
  <div id="app">
    <!--Vue's dominion-->
  </div>
  <div id="not-the-app">
    <!--Vue has no power here!-->
  </div>
</body>
No mounting to the body
You’d be excused for thinking that the
body tag would be a better place to mount, since there are many good reasons to want to have control over body classes, body events etc.The problem is that there are browser plugins and third party scripts that pollute the
bodywith their own classes, event listeners and will even append their own child nodes willy-nilly.That is just too scary for Vue, so the
body tag is out of bounds. In fact, as of version 2, if you attempt to mount there you will get this warning:"Do not mount Vue to <html> or <body> - mount to normal elements instead."
Managing the head and body tags
So now that we’ve established that Vue must mount on its very own node below the
body, and it can’t affect any part of the DOM above this mount node, how do you manage the body or head with Vue?The answer is: you can’t. Well not directly, at least. Anything outside the mount element is effectively invisible to Vue.
But there’s more to Vue than rendering. So even though there are elements beyond it’s reach, it can still assist you to reach them in other ways via watchers and lifecycle hooks.
Scenario #1: Listening to key events
Let’s say you’re creating a modal window with Vue and you want the user to be able to close the window with the escape key.
Vue gives you the
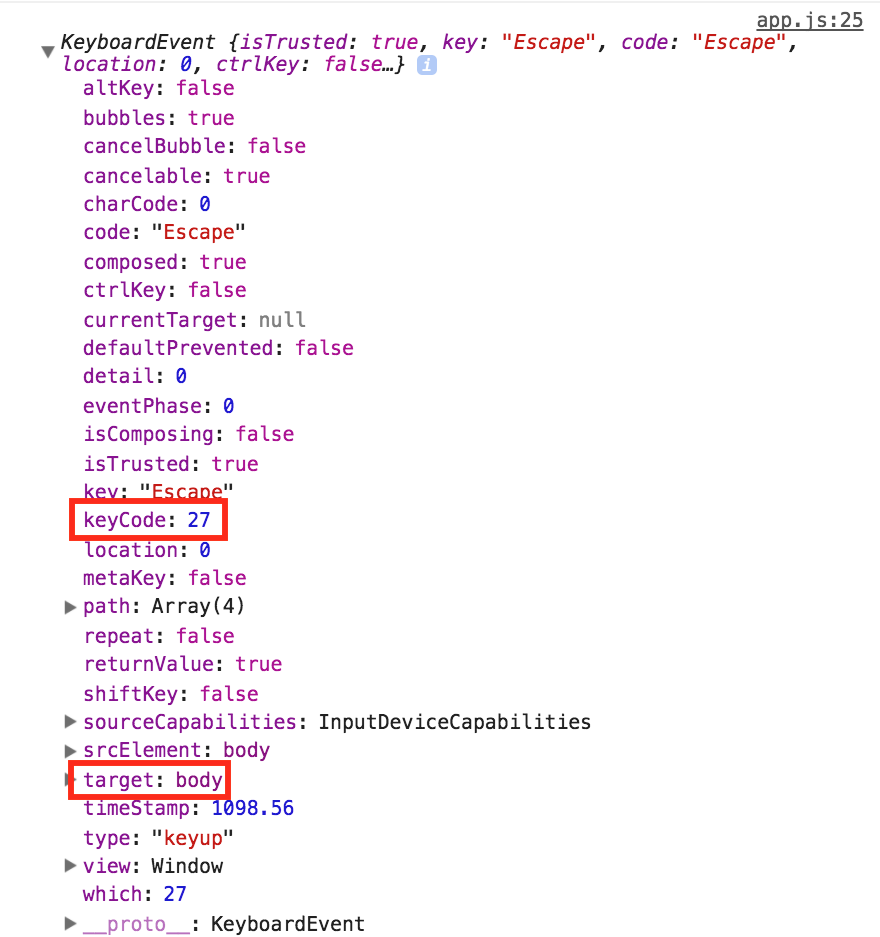
v-on directive for listening to events, but unless you are focused on a form input, key events are dispatched from the body tag:
Since the
body is out of Vue’s jurisdiction, you won’t be able to get Vue to listen to this event. You’ll have to set up your own event listener with the Web API:var app = new Vue({
el: '#app',
data: {
modalOpen: false
}
});
document.addEventListener('keyup', function(evt) {
if (evt.keyCode === 27 && app.modalOpen) {
app.modalOpen = false;
}
});
How Vue can help
Vue can help via its lifecycle hooks. Firstly, use the created hook to add the listener. This ensures that data properties you’re referencing (i.e.
modalOpen) are being observed when the callback is fired.Secondly, use the destroyed hook to remove the listener when it’s no longer needed to avoid memory leaks.
new Vue({
  el: '#app',
  data: {
    modalOpen: false
  },
  methods: {
    escapeKeyListener: function(evt) {
      if (evt.keyCode === 27 && this.modalOpen) {
        this.modalOpen = false;
      }
    }
  },
  created: function() {
    document.addEventListener('keyup', this.escapeKeyListener);
  },
  destroyed: function() {
    document.removeEventListener('keyup', this.escapeKeyListener);
  },
});
Scenario #2: Managing body classes
When a user opens your modal window, you want to completely disable the main window. To do this you can stack it behind a semi-transparent panel so it can’t be clicked, and clip any overflow so it can’t be scrolled.

To prevent scrolling, add a class to the body (let’s call it
modal-open) which makes the overflow: hidden.body.modal-open {
overflow: hidden;
}
Obviously we need to dynamically add and remove this class, as we’ll still want to allow scrolling when the modal is closed. We’d normally use
v-bind:class to do this job, but again, you can’t bind to body attributes with Vue, so we’re going to have to use the Web API again:// Modal opens
document.body.classList.add('modal-open');
// Modal closes
document.body.classList.remove('modal-closed');
How Vue can help
Vue adds reactive getters and setters to each data property so that when data value change it knows to update the DOM. Vue allows you to write custom logic that hooks into reactive data changes via watchers.
Vue will execute any watcher callbacks whenever the data value (in this case
modalOpen) changes. We’ll utilise this callback to update to add or remove the body class:var app = new Vue({
el: '#app',
data: {
modalOpen: false
},
watch: {
modalOpen: function(newVal) {
var className = 'modal-open';
if (newVal) {
document.body.classList.add(className);
} else {
document.body.classList.remove(className);
}
}
}
});
Monday, October 09, 2017
Truncate all tables in a MySQL database in one command? - Stack Overflow
Truncate all tables in a MySQL database in one command? - Stack Overflow
truncate multiple database tables on Mysql instance
SELECT Concat('TRUNCATE TABLE ',table_schema,'.',TABLE_NAME, ';')
FROM INFORMATION_SCHEMA.TABLES where  table_schema in ('db1_name','db2_name');
Use Query Result to truncate tables
Note: may be you will get this error:
ERROR 1217 (23000): Cannot delete or update a parent row: a foreign key constraint failsThat happens if there are tables with foreign keys references to the table you are trying to drop/truncate.
Before truncating tables All you need to do is:
SET FOREIGN_KEY_CHECKS=0;Truncate your tables and change it back to
SET FOREIGN_KEY_CHECKS=1;Saturday, September 02, 2017
PHP / PDO / SQLite3 Example - If Not True Then False
PHP / PDO / SQLite3 Example - If Not True Then False
This is a PHP, PDO and SQLite3 example, which demonstrates the SQLite3 databse usage with PHP-PDO. The PHP / PDO / SQLite3 example code demonstrates following things, and their use:
- Create / Connect SQLite3 databases
- Use SQLite3 file and memory databases
- Create tables in SQLite3 database
- Use SQLite3 db different datetime formats
- Insert data to SQLite3 database
- PDO / SQLite3 prepared statements
- Bind parameters to statement variables
- Bind values to statement variables
- Quote a string for use in a query
- Update data in SQLite3 database
- Select / Query from SQLite3 database and print query output
- Drop SQLite3 table
- Close SQLite3 connections
PHP / PDO / SQLite3 Example Code
PHP
<?php

  // Set default timezone
  date_default_timezone_set('UTC');

  try {
    /**************************************
    * Create databases and                *
    * open connections                    *
    **************************************/

    // Create (connect to) SQLite database in file
    $file_db = new PDO('sqlite:messaging.sqlite3');
    // Set errormode to exceptions
    $file_db->setAttribute(PDO::ATTR_ERRMODE,
                            PDO::ERRMODE_EXCEPTION);

    // Create new database in memory
    $memory_db = new PDO('sqlite::memory:');
    // Set errormode to exceptions
    $memory_db->setAttribute(PDO::ATTR_ERRMODE,
                              PDO::ERRMODE_EXCEPTION);


    /**************************************
    * Create tables                       *
    **************************************/

    // Create table messages
    $file_db->exec("CREATE TABLE IF NOT EXISTS messages (
                    id INTEGER PRIMARY KEY,
                    title TEXT,
                    message TEXT,
                    time INTEGER)");

    // Create table messages with different time format
    $memory_db->exec("CREATE TABLE messages (
                      id INTEGER PRIMARY KEY,
                      title TEXT,
                      message TEXT,
                      time TEXT)");


    /**************************************
    * Set initial data                    *
    **************************************/

    // Array with some test data to insert to database
    $messages = array(
                  array('title' => 'Hello!',
                        'message' => 'Just testing...',
                        'time' => 1327301464),
                  array('title' => 'Hello again!',
                        'message' => 'More testing...',
                        'time' => 1339428612),
                  array('title' => 'Hi!',
                        'message' => 'SQLite3 is cool...',
                        'time' => 1327214268)
                );


    /**************************************
    * Play with databases and tables      *
    **************************************/

    // Prepare INSERT statement to SQLite3 file db
    $insert = "INSERT INTO messages (title, message, time)
                VALUES (:title, :message, :time)";
    $stmt = $file_db->prepare($insert);

    // Bind parameters to statement variables
    $stmt->bindParam(':title', $title);
    $stmt->bindParam(':message', $message);
    $stmt->bindParam(':time', $time);

    // Loop thru all messages and execute prepared insert statement
    foreach ($messages as $m) {
      // Set values to bound variables
      $title = $m['title'];
      $message = $m['message'];
      $time = $m['time'];

      // Execute statement
      $stmt->execute();
    }

    // Prepare INSERT statement to SQLite3 memory db
    $insert = "INSERT INTO messages (id, title, message, time)
                VALUES (:id, :title, :message, :time)";
    $stmt = $memory_db->prepare($insert);

    // Select all data from file db messages table
    $result = $file_db->query('SELECT * FROM messages');

    // Loop thru all data from messages table
    // and insert it to file db
    foreach ($result as $m) {
      // Bind values directly to statement variables
      $stmt->bindValue(':id', $m['id'], SQLITE3_INTEGER);
      $stmt->bindValue(':title', $m['title'], SQLITE3_TEXT);
      $stmt->bindValue(':message', $m['message'], SQLITE3_TEXT);

      // Format unix time to timestamp
      $formatted_time = date('Y-m-d H:i:s', $m['time']);
      $stmt->bindValue(':time', $formatted_time, SQLITE3_TEXT);

      // Execute statement
      $stmt->execute();
    }

    // Quote new title
    $new_title = $memory_db->quote("Hi''\'''\\\"\"!'\"");
    // Update old title to new title
    $update = "UPDATE messages SET title = {$new_title}
                WHERE datetime(time) >
                datetime('2012-06-01 15:48:07')";
    // Execute update
    $memory_db->exec($update);

    // Select all data from memory db messages table
    $result = $memory_db->query('SELECT * FROM messages');

    foreach($result as $row) {
      echo "Id: " . $row['id'] . "\n";
      echo "Title: " . $row['title'] . "\n";
      echo "Message: " . $row['message'] . "\n";
      echo "Time: " . $row['time'] . "\n";
      echo "\n";
    }


    /**************************************
    * Drop tables                         *
    **************************************/

    // Drop table messages from file db
    $file_db->exec("DROP TABLE messages");
    // Drop table messages from memory db
    $memory_db->exec("DROP TABLE messages");


    /**************************************
    * Close db connections                *
    **************************************/

    // Close file db connection
    $file_db = null;
    // Close memory db connection
    $memory_db = null;
  }
  catch(PDOException $e) {
    // Print PDOException message
    echo $e->getMessage();
  }
?>
Example Code Output
Bash
Id: 1
Title: Hello!
Message: Just testing...
Time: 2012-01-23 06:51:04

Id: 2
Title: Hi''\'''\""!'"
Message: More testing...
Time: 2012-06-11 15:30:12

Id: 3
Title: Hi!
Message: SQLite3 is cool...
Time: 2012-01-22 06:37:48
Creating a RESTful API with Slim Framework 3, PHP/MySQl - Arjun
Creating a RESTful API with Slim Framework 3, PHP/MySQl - Arjun


Slim is a full-featured,open-source PHP micro framework that helps you quickly write simple yet powerful web applications and APIs. It comes with a sophisticated URL dispatcher and middleware architecture that makes it ideal for static websites or API prototyping. It supports all(GET, POST, PUT, DELETE) the HTTP methods.
This article examines Slim in detail, illustrating how you can use it to rapidly build and deploy a REST API with support for authentication and multiple request/response formats.
How to install
If you are using Composer, the PHP dependency manager, simply issue the following command
$ php composer.phar create-project slim/slim-skeleton [my-app-name] (or) $ composer create-project slim/slim-skeleton [my-app-name] |
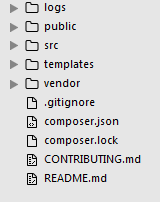
Replace [my-app-name] with the desired directory name for your new application. The above command will create a project using Slim-Skeleton application and it has below show directory structure.

Now You can run it with PHP’s built-in webserver or you can point your browser with full URL.
$ cd [my-app-name]; $ php -S localhost:8080 -t public public/index.php |
So after gone through the above steps, if you point your browser to
http://locahost:8080/, you would have following output in the browser –
Database design and table
Name your database whatever you want, and run below shown SQL it will create task table.
-- -- Table structure for `tasks` -- CREATE TABLE IF NOT EXISTS `tasks` ( `id` int(11) NOT NULL, `task` varchar(200) NOT NULL, `status` tinyint(1) NOT NULL DEFAULT '1', `created_at` datetime NOT NULL DEFAULT CURRENT_TIMESTAMP ) ENGINE=InnoDB DEFAULT CHARSET=latin1; ALTER TABLE `tasks` ADD PRIMARY KEY (`id`); ALTER TABLE `tasks` MODIFY `id` int(11) NOT NULL AUTO_INCREMENT; |
Insert some sample data into the tasks table.
INSERT INTO `tasks` (`id`, `task`, `status`, `created_at`) VALUES (1, 'Find bugs', 1, '2016-04-10 23:50:40'), (2, 'Review code', 1, '2016-04-10 23:50:40'), (3, 'Fix bugs', 1, '2016-04-10 23:50:40'), (4, 'Refactor Code', 1, '2016-04-10 23:50:40'), (5, 'Push to prod', 1, '2016-04-10 23:50:50'); |
Database configuration
Open your
src/settings.php file and configure your database setting by adding/editing below showing database config array. // Database connection settings "db" => [ "host" => "locahost", "dbname" => "your-database-name", "user" => "your-mysql-user", "pass" => "your-mysql-password" ], |
Now open your
src/dependencies.php file and configure database library. There are many database libraries available for PHP, but this example uses PDO – this is available in PHP as standard so it’s probably useful in every project, or you can use your own libraries by adapting the examples below.In the below code we are injecting database object into container using dependicy injection, in this case called db:
// PDO database library $container['db'] = function ($c) { $settings = $c->get('settings')['db']; $pdo = new PDO("mysql:host=" . $settings['host'] . ";dbname=" . $settings['dbname'], $settings['user'], $settings['pass']); $pdo->setAttribute(PDO::ATTR_ERRMODE, PDO::ERRMODE_EXCEPTION); $pdo->setAttribute(PDO::ATTR_DEFAULT_FETCH_MODE, PDO::FETCH_ASSOC); return $pdo; }; |
We are going to implement following API calls –
| Method | URL | Action |
|---|---|---|
| GET | /todos | Retrieve all todos |
| GET | /todos/search/bug | Search for todos with ‘bug’ in their name |
| GET | /todo/1 | Retrieve todo with id == 1 |
| POST | /todo | Add a new todo |
| PUT | /todo/1 | Update todo with id == 1 |
| DELETE | /todo/1 | Delete todo with id == 1 |
Implementing the API calls with Slim
Now that we have our Slim app up and running with database connection, we need to manage todos in the database.
Getting the Todos list – We are going to create a new route so that when a user hits /todos, it will return a list of all todos in JSON format. Open your
src/routes.php and add// get all todos $app->get('/todos', function ($request, $response, $args) { $sth = $this->db->prepare("SELECT * FROM tasks ORDER BY task"); $sth->execute(); $todos = $sth->fetchAll(); return $this->response->withJson($todos); }); |
This function simply return all todos information as you can see in this query, to call this API use this URL
http://localhost:8080/todos.Getting single todo – We are going to create a new route so that when a user hits /todo/{id}, it will return a todo in JSON format.
// Retrieve todo with id $app->get('/todo/[{id}]', function ($request, $response, $args) { $sth = $this->db->prepare("SELECT * FROM tasks WHERE id=:id"); $sth->bindParam("id", $args['id']); $sth->execute(); $todos = $sth->fetchObject(); return $this->response->withJson($todos); }); |
This function check record of given id and return if found anything, to call this API use this URL
http://localhost/todo/1.Find todo by name – We are going to create a new route so that when a user hits /todos/search/{Query}, it will return a list of all matched todos in JSON format.
// Search for todo with given search teram in their name $app->get('/todos/search/[{query}]', function ($request, $response, $args) { $sth = $this->db->prepare("SELECT * FROM tasks WHERE UPPER(task) LIKE :query ORDER BY task"); $query = "%".$args['query']."%"; $sth->bindParam("query", $query); $sth->execute(); $todos = $sth->fetchAll(); return $this->response->withJson($todos); }); |
This function search in database for your given query, to call this API use this URL
http://localhost/todos/search/bugAdd todo – We are going to create a new route so that when a user sends a post request to /todo with required data, app will add a new record to the database.
// Add a new todo $app->post('/todo', function ($request, $response) { $input = $request->getParsedBody(); $sql = "INSERT INTO tasks (task) VALUES (:task)"; $sth = $this->db->prepare($sql); $sth->bindParam("task", $input['task']); $sth->execute(); $input['id'] = $this->db->lastInsertId(); return $this->response->withJson($input); }); |
This API accept post request and insert submitted data in your database. To call this API use this URL
http://localhost/todoDelete Task – We are going to create a new route so that when a user sends a delete request to /todo/{id}, app will delete a record from the database.
// DELETE a todo with given id $app->delete('/todo/[{id}]', function ($request, $response, $args) { $sth = $this->db->prepare("DELETE FROM tasks WHERE id=:id"); $sth->bindParam("id", $args['id']); $sth->execute(); $todos = $sth->fetchAll(); return $this->response->withJson($todos); }); |
Update Task – We are going to create a new route so that when a user sends a put request to /todo/{id} with required data, app will updated a record based on match parameter in the database.
// Update todo with given id $app->put('/todo/[{id}]', function ($request, $response, $args) { $input = $request->getParsedBody(); $sql = "UPDATE tasks SET task=:task WHERE id=:id"; $sth = $this->db->prepare($sql); $sth->bindParam("id", $args['id']); $sth->bindParam("task", $input['task']); $sth->execute(); $input['id'] = $args['id']; return $this->response->withJson($input); }); |
This API accept put request and updates submitted data in your database. To call this API use this URL
http://localhost/todo/{id}Here is the the complete final
src/routes.php file // get all todos $app->get('/todos', function ($request, $response, $args) { $sth = $this->db->prepare("SELECT * FROM tasks ORDER BY task"); $sth->execute(); $todos = $sth->fetchAll(); return $this->response->withJson($todos); }); // Retrieve todo with id $app->get('/todo/[{id}]', function ($request, $response, $args) { $sth = $this->db->prepare("SELECT * FROM tasks WHERE id=:id"); $sth->bindParam("id", $args['id']); $sth->execute(); $todos = $sth->fetchObject(); return $this->response->withJson($todos); }); // Search for todo with given search teram in their name $app->get('/todos/search/[{query}]', function ($request, $response, $args) { $sth = $this->db->prepare("SELECT * FROM tasks WHERE UPPER(task) LIKE :query ORDER BY task"); $query = "%".$args['query']."%"; $sth->bindParam("query", $query); $sth->execute(); $todos = $sth->fetchAll(); return $this->response->withJson($todos); }); // Add a new todo $app->post('/todo', function ($request, $response) { $input = $request->getParsedBody(); $sql = "INSERT INTO tasks (task) VALUES (:task)"; $sth = $this->db->prepare($sql); $sth->bindParam("task", $input['task']); $sth->execute(); $input['id'] = $this->db->lastInsertId(); return $this->response->withJson($input); }); // DELETE a todo with given id $app->delete('/todo/[{id}]', function ($request, $response, $args) { $sth = $this->db->prepare("DELETE FROM tasks WHERE id=:id"); $sth->bindParam("id", $args['id']); $sth->execute(); $todos = $sth->fetchAll(); return $this->response->withJson($todos); }); // Update todo with given id $app->put('/todo/[{id}]', function ($request, $response, $args) { $input = $request->getParsedBody(); $sql = "UPDATE tasks SET task=:task WHERE id=:id"; $sth = $this->db->prepare($sql); $sth->bindParam("id", $args['id']); $sth->bindParam("task", $input['task']); $sth->execute(); $input['id'] = $args['id']; return $this->response->withJson($input); }); |
I hope you like this Post, Please feel free to comment below, your suggestion and problems if you face - we are here to solve your problems.
Subscribe to:
Comments (Atom)