EmailThis Premium lets you save unlimited bookmarks, PDF, DOCX files, PPTs and images. It also gives you a PDF copy of every page that you save. Upgrade to Premium →
Update Aug 12, 2017: All of the examples have now been updated for Vue 2.0!
I was working on an app idea with Vue.js and Laravel the other day and needed to create some modal forms that were submitted asynchronously.
The example on the Vue.js website is a great starting point, but it breaks down when two modals need different behavior.
A starting point
Let's say we're building a blog (how creative) and we want a modal form for creating a new post.
Playing off of the example above, we might start with something like this:
It's a good start, but there's a few things missing that I'd like to add:
Close the modal when clicking on the background.
Close the modal when the escape key is pressed.
Reset the form data when the modal is closed.
Closing when the background is clicked
The easiest way to do this is to bind a click handler to the background that closes the form:
This gets us close but you'll notice that if you click inside the modal, the modal still closes because the click event is bubbling up to the .modal-mask element.
We can fix this by using @click.stop on the modal itself to prevent click events from propagating to the parent:
If the escape key is pressed, we check to see if the modal is currently open, and if so, close it.
Here's what that gives us:
Resetting the form when the modal is closed
You'll notice right now that if you open the modal, fill out the fields, and then close the modal, the fields are still filled out when you open it again.
We can solve that by adding some v-model bindings to our form fields, and clearing them when we close the form:
<divclass="modal-body"><labelclass="form-label"> Title <inputv-model="title"class="form-control"></label><labelclass="form-label"> Body <textareav-model="body"rows="5"class="form-control"></textarea></label></div>
Say we needed another modal form for commenting on a post.
Right now that would mean duplicating the entire component, including a lot of standard modal behavior (like closing when the escape key is pressed or the background is clicked), because we've built our form and modal as one component.
We need to somehow extract the pieces that are going to be the same for every modal. So what's going to stay the same for each modal, and what might change?
Things that will stay the same:
Popup behavior
Closing when pressing escape
Closing when clicking the background
Performing some sort of reset when it closes
Things that will change:
The form fields themselves
Any necessary validation
The endpoint that the form is going to submit to
One approach to this would be to setup a complex combination of custom props and slots on the modal and try to make the entire thing configurable.
This is a bad idea.
A better solution is to think of the contents of the modal as a completely separate, swappable component.
Extracting a modal component
How we pull this off might seem a little counter-intuitive.
Instead of thinking of one modal where we can swap the contents, think of the new post and new comment modals as their own components that each contain a base modal as their "shell".
A little confusing, I know, but hang in there with me.
First, let's acknowledge that our current modal is really a NewPostModal, and update the name in a few places:
Next, let's start moving the reusable pieces to a new component.
The .modal-mask and .modal-container elements represent the shell that we want to reuse, so let's move those into the new component, and add a <slot> to render our form:
We've now got a simple, reusable modal component that encapsulates any shared modal behavior.
I won't bother going through every step of building out a second modal (this is quite a long post already), but here's a demo you can play with to see how it would work:
Hopefully this gives you a better idea of how you can extract reusable components and stitch them together with Vue.js.
Learning More
If you enjoyed this post, you might be interested in Advanced Vue Component Design, a video series I'm working on that goes deep into tons of useful component design patterns.
Subscribe below for periodic updates, free screencasts, and a big discount when the course is released in May 2018:
The following is a guest post by David Corbacho, a front end engineer in London. We've broached this topic before, but this time, David is going to drive
EmailThis Premium lets you save unlimited bookmarks, PDF, DOCX files, PPTs and images. It also gives you a PDF copy of every page that you save. Upgrade to Premium →
The following is a guest post by David Corbacho, a front end engineer in London. We've broached this topic before, but this time, David is going to drive the concepts home through interactive demos that make things very clear.
Debounce and throttle are two similar (but different!) techniques to control how many times we allow a function to be executed over time.
Having a debounced or throttled version of our function is especially useful when we are attaching the function to a DOM event. Why? Because we are giving ourselves a layer of control between the event and the execution of the function. Remember, we don't control how often those DOM events are going to be emitted. It can vary.
For example, let's talk about scroll events. See this example:
When scrolling using a trackpad, scroll wheel, or just by dragging a scrollbar can trigger easily 30 events per second. But scrolling slowly (swapping) in a smartphone could trigger as much as 100 events per second during my tests. Is your scroll handler prepared for this rate of execution?
In 2011, an issue popped up on the Twitter website: when you were scrolling down your Twitter feed, it became slow and unresponsive. John Resig published a blog post about the problem where it was explained how bad of an idea it is to directly attach expensive functions to the scroll event.
The suggested solution by John (at that time, five years ago) was a loop running every 250ms, outside of the onScroll event. That way the handler is not coupled to the event. With this simple technique, we can avoid ruining the user experience.
These days there are slightly more sophisticated ways of handling events. Let me introduce you to Debounce, Throttle, and requestAnimationFrame. We'll also look at the matching use cases.
The Debounce technique allow us to "group" multiple sequential calls in a single one.
Imagine you are in an elevator. The doors begin to close, and suddenly another person tries to get on. The elevator doesn't begin its function to change floors, the doors open again. Now it happens again with another person. The elevator is delaying its function (moving floors), but optimizing its resources.
Try it for yourself. Click or move the mouse on top of the button:
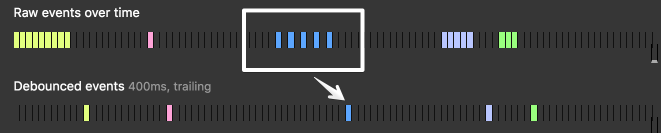
You can see how sequential fast events are represented by a single debounced event. But if the events are triggered with big gaps, the debouncing doesn't happen.
Leading edge (or "immediate")
You may find it irritating that the debouncing event waits before triggering the function execution, until the events stop happening so rapidly. Why not trigger the function execution immediately, so it behaves exactly as the original non-debounced handler? But not fire again until there is a pause in the rapid calls.
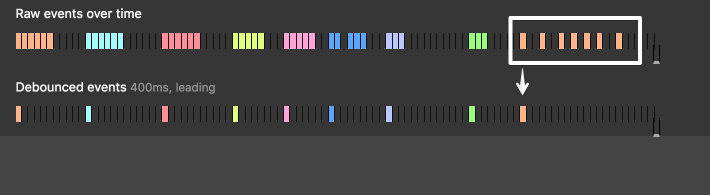
You can do this! Here's an example with the leading flag on:
Example of a "leading" debounce.
In underscore.js, the option is called immediate instead of leading
Try it for yourself:
Debounce Implementations
The first time I saw debounce implemented in JavaScript was in 2009 in this John Hann post (who also coined the term).
Soon after that, Ben Alman created a jQuery plugin (no longer maintained), and a year after, Jeremy Ashkenas added it to underscore.js. It was later added to Lodash, a drop-in alternative to underscore.
The 3 implementations are a bit different internally, but their interface is almost identical.
There was a time that underscore adopted the debounce/throttle implementation from Lodash, after I discovered a bug in the _.debounce function in 2013. Since then, both implementations have grown apart.
Lodash has added more features to its _.debounce and _.throttle functions. The original immediate flag was replaced with leading and trailing options. You can choose one, or both. By default, only the trailing edge is enabled.
The new maxWait option (only in Lodash at the moment) is not covered in this article but it can be very useful. Actually, the throttle function is defined using _.debounce with maxWait, as you see in the lodash source code.
Debounce Examples
Resize Example
When resizing a (desktop) browser window, they can emit many resize events while dragging the resize handle.
See for yourself in this demo:
As you can see, we are using the default trailing option for the resize event, because we are only interested on the final value, after user stops resizing the browser.
keypress on autocomplete form with Ajax request
Why to send Ajax requests to the server every 50ms, when the user is still typing? _.debounce can help us, avoiding extra work, and only send the request when the user stops typing.
Here, it wouldn't make sense to have the leading flag on. We want to wait to the last letter typed.
A similar use case would be to wait until user stops typing before validate its input. "Your password is too short" type of messages.
#How to use debounce and throttle and common pitfalls
It can be tempting to build your own debounce/throttle function, or copy it from some random blog post. My recommendation is to use underscore or Lodash directly. If you only need the _.debounce and _.throttle functions, you can use Lodash custom builder to output a custom 2KB minified library. Build it with this simple command:
npm i -g lodash-cli lodash include = debounce, throttle
That said, most use the modular form `lodash/throttle` and `lodash/debounce` or `lodash.throttle` and `lodash.debounce` packages with webpack/browserify/rollup.
A common pitfall is to call the _.debounce function more than once:
Creating a variable for the debounced function will allow us to call the private method debounced_version.cancel(), available in lodash and underscore.js, in case you need it.
var debounced_version = _.debounce(doSomething,200);$(window).on('scroll', debounced_version); debounced_version.cancel();
By using _.throttle, we don't allow to our function to execute more than once every X milliseconds.
The main difference between this and debouncing is that throttle guarantees the execution of the function regularly, at least every X milliseconds.
The same way than debounce, throttle technique is covered by Ben's plugin, underscore.js and lodash.
Throttling Examples
Infinite scrolling
A quite common example. The user is scrolling down your infinite-scrolling page. You need to check how far from the bottom the user is. If the user is near the bottom, we should request via Ajax more content and append it to the page.
Here our beloved _.debounce wouldn't be helpful. It only would trigger only when the user stops scrolling.. and we need to start fetching the content before the user reaches the bottom. With _.throttle we can warranty that we are checking constantly how far we are from the bottom.
requestAnimationFrame is another way of rate-limiting the execution of a function.
It can be thought as a _.throttle(dosomething, 16). But with a much higher fidelity, since it's a browser native API that aims for better accuracy.
We can use the rAF API, as an alternative to the throttle function, considering this pros/cons:
Pros
Aims for 60fps (frames of 16 ms) but internally will decide the best timing on how to schedule the rendering.
Fairly simple and standard API, not changing in the future. Less maintenance.
Cons
The start/cancelation of rAFs it's our responsibility, unlike .debounce or .throttle, where it's managed internally.
If the browser tab is not active, it would not execute. Although for scroll, mouse or keyboard events this doesn't matter.
Although all modern browsers offer rAF, still is not supported in IE9, Opera Mini and old Android. A polyfill would be needed still today.
rAF is not supported in node.js, so you can't use it on the server to throttle filesystem events.
As a rule of thumb, I would use requestAnimationFrame if your JavaScript function is "painting" or animating directly properties, use it at everything that involves re-calculating element positions.
To make Ajax requests, or deciding if adding/removing a class (that could trigger a CSS animation), I would consider _.debounce or _.throttle, where you can set up lower executing rates (200ms for example, instead of 16ms)
If you think that rAF could be implemented inside underscore or lodash, they both have rejected the idea, since it's a specialized use case, and it's easy enough to be called directly.
Examples of rAF
I will cover only this example to use requestAnimation frame on scroll, inspired by Paul Lewis article, where he explains step-by-step the logic of this example.
I put it side by side to compare it to _.throttle at 16ms. Giving similar performance, but probably rAF will give you better results on more complex scenarios.
A more advanced example where I've seen this technique is in the library headroom.js, where the logic is decoupled and wrapped inside an object.
Use debounce, throttle and requestAnimationFrame to optimize your event handlers. Each technique is slightly different, but all three of them are useful and complement each other.
In summary:
debounce: Grouping a sudden burst of events (like keystrokes) into a single one.
throttle: Guaranteeing a constant flow of executions every X milliseconds. Like checking every 200ms your scroll position to trigger a CSS animation.
requestAnimationFrame: a throttle alternative. When your function recalculates and renders elements on screen and you want to guarantee smooth changes or animations. Note: no IE9 support.