Wednesday, March 28, 2012

Travelling through development: Git, TortoiseGit and (Putty) SSH keys for Windows

Git, TortoiseGit and (Putty) SSH keys for Windows

Okay, I finally got Git to work. Here's the necessary steps, after having installed msysgit and TortoiseGit.


First, create the local repository.


You'll get a notification that an empty repository was created. You can now use the repository to track your changes.
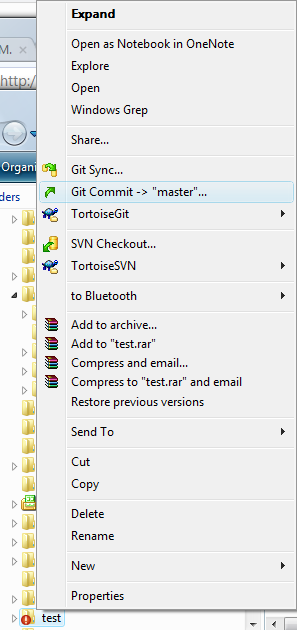
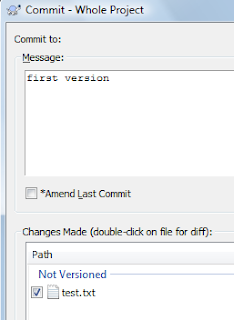


But of course, you want to push this stuff to a server, as backup, because other people will collaborate on your project, etc. I'm using Unfuddle so I'll concentrate on that (check out Git for Windows Developers for info onGitHub).


Create a new Project in Unfuddle. Then, create a new repository and associate the repository to the project. Remember to choose Git as repository type.


Now you need to generate a public SSH key to authenticate yourself. If you installed TortoiseGit, you should have Puttygen installed too. Open it and generate a private and a public key.


Save the public key and the private key with the same filename, the only difference is that the private key should have a .ppk file extension. Also, copy the public key in the top part of the Putty Key Generator.
Now, in the Personal Settings of your Unfuddle account, create a new key and paste it accordingly.


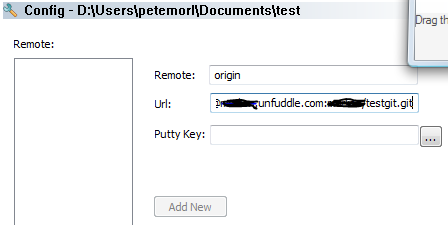
Now right-click on your local Git repository and choose 'Settings'. Go to the 'Remote' node and choose 'Add New'. Give it a name (TortoiseGit will suggest 'remote') and paste the URL you can find in Unfuddle. Point TortoiseGit to the correct (private) putty key.

Now you have one more thing to do. Start Pageant (C:\Program Files\TortoiseGit\bin\pageant.exe) if it hasn't already started, and add the private key you made a few steps earlier.

That's it! You can now right-click on your local repository and choose to Push to push your changes to Unfuddle.


Travelling through development: Git, TortoiseGit and (Putty) SSH keys for Windows

More than 3 requests, I'll translate this to Chinese.
超过3个请求,我就会把这篇文章翻译成中文。

How To Upgrade Wamp to PHP 5.3.4 | DotKernel PHP Application Framework

1.    Stop WAMP server.
2.    Go to windows.php.net and download the the latests ZIPPED package for php5.3.4.
Make sure it is the VC6 Thread Safe build. DO NOT DOWNLOAD THE INSTALLER.
3.  Create a folder php5.3.4 into wamp/bin/php
4.  Extract the downloaded zip to the newly created php5.3.4 folder
5.  Copy the files:
-  php.ini
-  phpForApache.ini
-   wampserver.conf
from your existing php5.3 (eg.   wamp/bin/php/php5.3.3) folder to the new php5.3.4 folder.
6.  Open the files:
-   php.ini
-  phpForApache.ini
and search/replace the string 5.3.3 with 5.3.4
7.   Go to wamp/bin/apache/apache/apache2.2.11/bin and delete the file called php.ini
8.   Restart WAMP server.
9.   Choose php version 5.3.0
10.   Restart WAMP server.
11.   Now choose php version 5.3.4 .
12.   Check if PEAR path is correct in php.ini , and modify accordingly.
13.   Restart WAMP server.
14.   Enjoy.


How To Upgrade Wamp to PHP 5.3.4 | DotKernel PHP Application Framework

Friday, March 02, 2012

How to delete an element from an array in php? - Stack Overflow

How to delete an element from an array in php? - Stack Overflow

$key = array_search($needle,$array);
if(isset($key)){
unset
($array[$key]);
}

More than 3 requests, I'll translate this to Chinese.
超过3个请求,我就会把这篇文章翻译成中文。

Get Only Public Class Properties for the Current Class in PHP | Vance Lucas

Get Only Public Class Properties for the Current Class in PHP | Vance Lucas

PHP provides two built-in functions to retrieve properties of a given class –get_object_vars and get_class_vars. Both these functions behave the same exact way, one taking an object as a variable and the other taking a string class name. The tricky thing about the two functions is that they behave differently depending on the call scope, returning all of the class variables available within the called scope. So if you call either function within the current class you need properties from, all properties are returned – public, protected, and private – because the current scope has access to them all. This makes seemingly simple things like returning all the public properties within the current class a bit of a pain if you want to keep the code inside the class itself.

The obvious solution is to use the functions from a different call scope, which means either moving the call outside the class to the implementation code (yuck), or creating a new function outside the class for it. A lot of suggestions in the PHP manual say to create a new function below the class definition and call it within the class (kind of a proxy function as a workaround), but that seems tacky. Luckily, PHP also provides another way to get a new call scope: anonymous functions (and closures as of PHP 5.3).

1 2 3 4 5 6 7 8 9 10 11 12 
class BobUser {  public $name = 'bob';  public $publicFlag = true;  protected $internalFlag = true;    public function getFields()  {   $getFields = create_function('$obj', 'return get_object_vars($obj);');   return $getFields($this); // Returns only 'name' and 'publicFlag'  } }

We can also do this the PHP 5.3 way with a much nicer-looking closure:

1 2 3 4 5 6 7 8 9 
class BobUser {  // ...  public function getFields()  {   $getFields = function($obj) { return get_object_vars($obj); };   return $getFields($this);  } }

Monday, February 13, 2012

Symfony: get the working environment(Development or Production) | DecentMind

Symfony: get the working environment(Development or Production) | DecentMind

While developing an application in Symfony , You might want to run some part of your code in development environment and other part in production environment. In such situation you can use sfConfig::get class to get the environment in which your application is running, And you can use this as a condition to run your code.
web/index.php is the file where you declare your Symfony environment:

define('SF_ROOT_DIR',realpath(dirname(__FILE__).'/..')); define('SF_APP','myapp'); define('SF_ENVIRONMENT', 'prod'); define('SF_DEBUG', false); require_once(SF_ROOT_DIR.DIRECTORY_SEPARATOR.'apps'.DIRECTORY_SEPARATOR.SF_APP.DIRECTORY_SEPARATOR.'config'.DIRECTORY_SEPARATOR.'config.php'); sfContext::getInstance()->getController()->dispatch();

Now you can get the environment using following:

$sf_environment = sfConfig::get('sf_environment');

$sf_environment variable will return string as ‘prod’ and you can use it as condition

$sf_environment = sfConfig::get('sf_environment'); if($sf_environment==prod) {     do this..... } else {     do this..... }

In-fact you can use sfConfig::get to access any configuration of your application declared in yml files.

Happy Coding….. :)


More than 3 requests, I'll translate this to Chinese.
超过3个请求,我就会把这篇文章翻译成中文。