Wednesday, September 19, 2018

Make Bash on Ubuntu on Windows 10 Look Like the Ubuntu Terminal


The end result of this tutorial will turn your Command Prompt-esque bash terminal into an interface that matches the functionality of the Ubuntu Linux operating system with its distinct purple appearance.
The introduction of Windows Linux Subsystem and Bash on Ubuntu on Windows 10 with the Windows 10 Anniversary Update represented a substantial gain for developers and power users using the Windows 10 platform. I eagerly installed the beta feature shortly after finishing the Windows update. However, upon launching my brand spankin’ new bash terminal, I noticed that the terminal retained the appearance of command prompt instead of resembling that of the terminal in the Linux distribution.
To make your terminal match the appearance of the Ubuntu Terminal, follow this guide.

To start, we will need an official Ubuntu font. Head to this Ubuntu website to download the official Ubuntu fonts for free.
The Ubuntu Mono font is the font used by default in the Ubuntu terminal application.
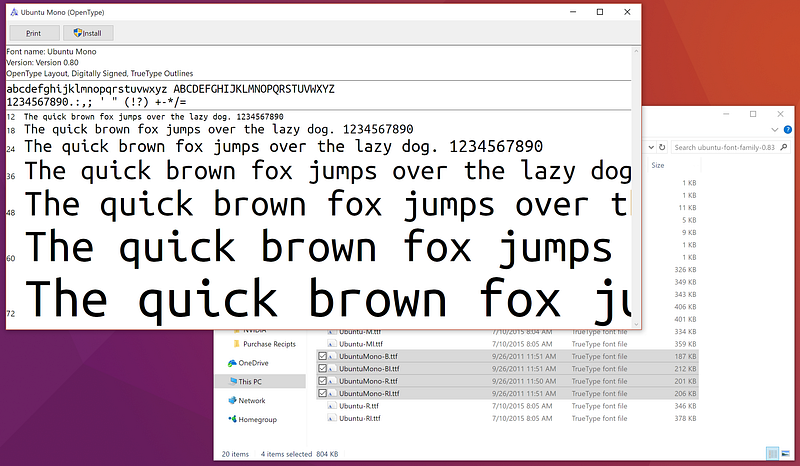
Once you’ve saved the .zip file, extract the contents and open the folder that was previously inside the .zip download. Inside that folder, you will find four .ttf font files with names starting with “UbuntuMono”:
  • “UbuntuMono-B.ttf” — the Ubuntu Mono font’s bold variant,
  • “UbuntuMono-BI.ttf” — the Ubuntu Mono font’s bold and italicized variant,
  • “UbuntuMono-R.ttf” — the Ubuntu Mono font’s regular variant;
  • “UbuntuMono-RI.ttf” — the Ubuntu Mono font’s italicized variant.
Install these four fonts by clicking the “Install” button in the Windows Font Viewer windows when you open each of these fonts.
Next, we will change the bash window to use the Ubuntu Mono font.
A demonstration of where to find the “Properties” options pane using Command Prompt.
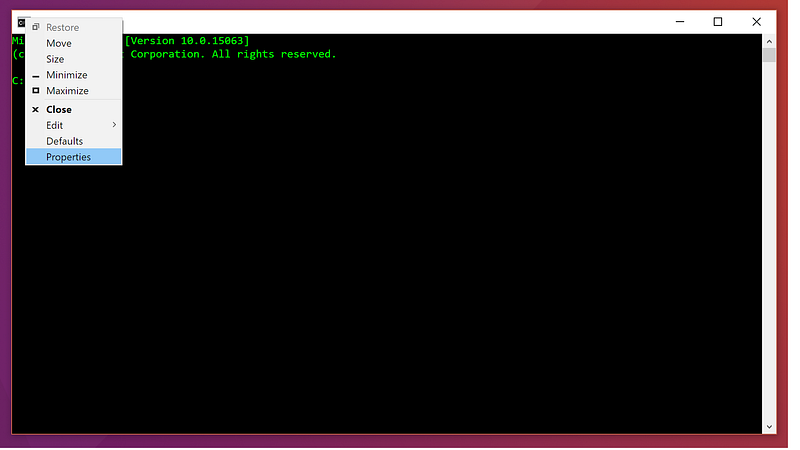
Open up Bash on Ubuntu on Windows 10.* Right-click the little icon in the upper left hand corner of the window and select “Properties”. You can also do this with the “Defaults” option, but that will change the appearance of Command Prompt windows as well as Bash windows. Some people may prefer this, but I recommend starting with “Properties” in Bash if you’re not sure if you will like the new look.
*If this is your first time launching Bash on Ubuntu on Windows 10, you will have to complete the first time setup. Do this first if you have not done it already.
Scroll down to the bottom of the font list and select “Ubuntu Mono.”
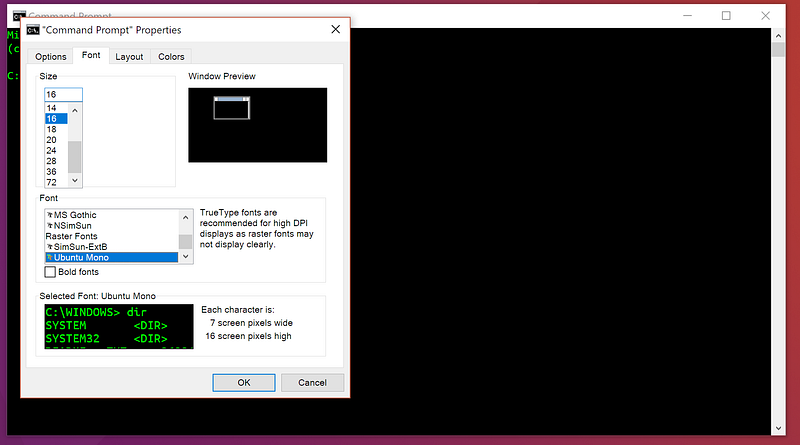
From the new window that should have popped up, select the “Font” tab. You will see a section appropriately named “Font” with a list of fonts. Select the recently installed “Ubuntu Mono” font.
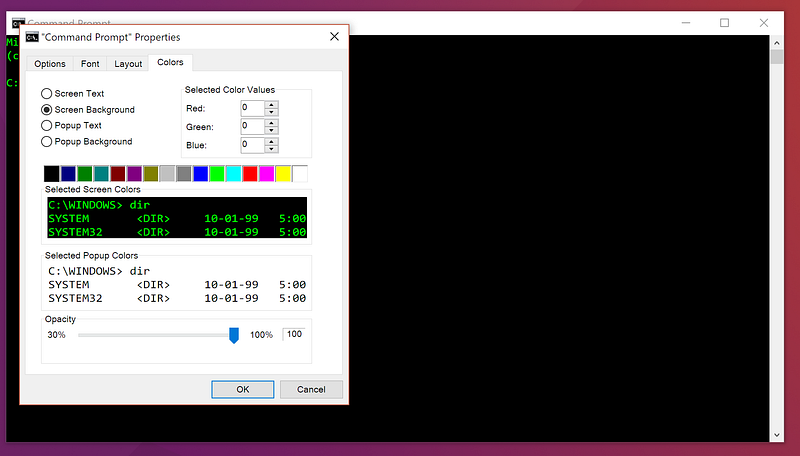
Next, move on to the “Colors” tab.
The default colors panel should look something like this:
The default Windows Command Prompt color scheme.
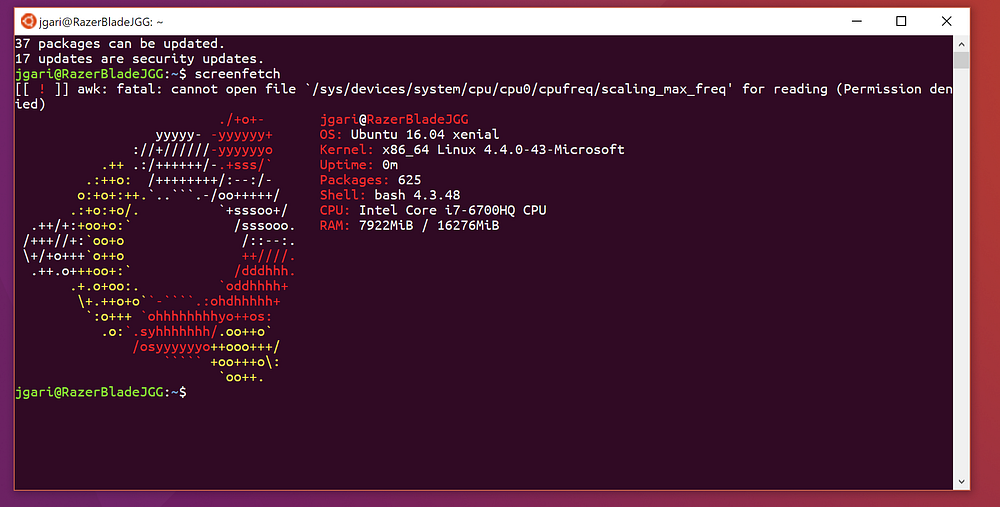
Our goal is to make it look like this:
The default Ubuntu Terminal color scheme.
This part of the process is the most tedious, but also the most rewarding.
In the corresponding color slots, change the RGB values to the following:
Slot 1: Red: 48, Green: 10, Blue: 36
Slot 2: Red: 52, Green: 101, Blue: 164
Slot 3: Red: 78, Green: 154, Blue: 6
Slot 4: Red: 6, Green: 152, Blue: 154
Slot 5: Red: 204, Green: 0, Blue: 0
Slot 6: Red: 117, Green: 80, Blue: 123
Slot 7: Red: 196, Green: 160, Blue: 0
Slot 8: Red: 211, Green: 215, Blue: 207
Slot 9: Red: 85, Green: 87, Blue: 83
Slot 10: Red: 114, Green: 159, Blue: 207
Slot 11: Red: 138, Green: 226, Blue: 52
Slot 12: Red: 52, Green: 226, Blue: 226
Slot 13: Red: 239, Green: 41, Blue: 41
Slot 14: Red: 173, Green: 127, Blue: 168
Slot 15: Red: 252, Green: 233, Blue: 79
Slot 16: Red: 238, Green: 238, Blue: 238
Now, make sure the “Screen Text” and “Popup Background” are set to the near-white color of slot 16 and the “Screen Background” and “Popup Text” are set to deep purple color of slot 1. Click the “OK” button.
You’re done! Enjoy cd-ing and grep-ing all you want with your newly colored Ubuntu Bash Terminal!

Friday, July 27, 2018

Installing PHP7.2 on a Rapsberry Pi - janw.me

Installing PHP7.2 on a Rapsberry Pi

To get a big performance boost we will use PHP 7.1 instead of the older 5.6 which Rasbian still uses by default. But because this is the default we will need to do a few extra tweaks.
In the file /etc/apt/sources.list.d/10-buster.list add
deb http://mirrordirector.raspbian.org/raspbian/ buster main contrib non-free rpi
After saving create the next file sudo nano /etc/apt/preferences.d/10-buster. With the content:
Package: *
Pin: release n=stretch
Pin-Priority: 900

Package: *
Pin: release n=buster
Pin-Priority: 750
Again save. Make the system aware of this source list with
sudo apt update
Now we are ready to install PHP7 with all it’s modules:
sudo apt-get install -y -t buster php7.2-fpm php7.2-curl php7.2-gd php7.2-intl php7.2-mbstring php7.2-mysql php7.2-imap php7.2-opcache php7.2-sqlite3 php7.2-xml php7.2-xmlrpc php7.2-zip php-apcu
When done check it with php -v it should show a PHP 7.2. (or higher).
Now we need to add a few fpm things for nginx to work properly.
sudo nano /etc/php/7.2/fpm/conf.d/90-pi-custom.ini
And add:
cgi.fix_pathinfo=0

upload_max_filesize=64m
post_max_size=64m
max_execution_time=600
Finally reload php
sudo service php7.2-fpm reload
Now PHP is ready to use

Extra

You might want image optimization.
We have installed php-gp for that. But that is not enough.
sudo apt install -y optipng gifsicle libjpeg-progs

Thursday, July 19, 2018

linux - Count files in a directory with filename matching a string - Stack Overflow

linux - Count files in a directory with filename matching a string - Stack Overflow


I suggest to use find as shown below. The reason for that is that filenames may contain newlines which would break a script that is using wc -l. I'm printing just a dot per filename and count the dots with wc -c:
find /some/path/some/dir/ -maxdepth 1 -name 'some_mask_*.txt' -printf '.' | wc -c
or if you want to write the results to variable:
ifiles=$(find /some/path/some/dir/ -maxdepth 1 -name 'some_mask_*.txt' -printf '.' | wc -c)

Friday, July 13, 2018

linux - Run parallel multiple commands at once in the same terminal - Stack Overflow

linux - Run parallel multiple commands at once in the same terminal - Stack Overflow


This bash script is for N parallel threads. Each argument is a command.
trap will kill all subprocesses when SIGINT is catched.
wait $PID_LIST is waiting each process to complete. When all processes have completed, the program exits.
#!/bin/bash

for cmd in "$@"; do {
  echo "Process \"$cmd\" started";
  $cmd & pid=$!
  PID_LIST+=" $pid";
} done

trap "kill $PID_LIST" SIGINT

echo "Parallel processes have started";

wait $PID_LIST

echo
echo "All processes have completed";
Save this script as parallel_commands and make it executable.
This is how to use this script:
parallel_commands "cmd arg0 arg1 arg2" "other_cmd arg0 arg2 arg3"
Example:
parallel_commands "sleep 1" "sleep 2" "sleep 3" "sleep 4"
Start 4 parallel sleep and waits until "sleep 4" finishes.

Sunday, July 01, 2018

aria2 on Raspberry Pi | Installation and Troubleshooting

https://edwinvakkachan.wordpress.com/2018/02/07/aria2-on-raspberry-pi-installation-and-troubleshooting/

Installing aria2 on Raspberry Pi

aria2 is a lightweight multi-protocol & multi-source command-line download utility. It supports HTTP/HTTPS, FTP, SFTP, BitTorrent and Metalink. aria2 can be manipulated via built-in JSON-RPC and XML-RPC interfaces. They said.

Installation:

First thing first, always update your repository.
sudo apt-get update
Next, download aria2.
sudo apt-get install aria2
Now, we make a config file for aria2. First, make the directory for it.
sudo mkdir /home/pi/.aria2
And make the config file.
sudo nano /home/pi/.aria2/aria2.conf
Here’s my configuration, you can always configure it yourself using this guide.
dir=/home/pi/downloads
file-allocation=falloc
continue
log-level=error
max-connection-per-server=4
summary-interval=120
daemon=true
enable-rpc=true
rpc-listen-port=6800
rpc-listen-all=true
max-concurrent-downloads=1
disable-ipv6=true
disk-cache=25M
timeout=600
retry-wait=30
max-tries=50
Now, we make aria2 can run on boot. First, make init.d file.
sudo nano /etc/init.d/aria2
Here’s my script:
#! /bin/sh
# /etc/init.d/aria2
### BEGIN INIT INFO
# Provides: aria2cRPC
# Required-Start: $network $local_fs $remote_fs
# Required-Stop: $network $local_fs $remote_fs
# Default-Start: 2 3 4 5
# Default-Stop: 0 1 6
# Short-Description: aria2c RPC init script.
# Description: Starts and stops aria2 RPC services.
### END INIT INFO
RETVAL=0
case “$1” in
start)
echo -n “Starting aria2c daemon ”
umask 0000
aria2c –daemon=true –enable-rpc –rpc-listen-all -D –conf-path=/home/pi/.aria2/aria2.conf
RETVAL=$?
echo
;;
stop)
echo -n “Shutting down aria2c daemon ”
/usr/bin/killall aria2c
RETVAL=$?
echo
;;
restart)
stop
sleep 3
start
;;
*)
echo $”Usage: $0 {start|stop|restart}”
RETVAL=1
esac
exit $RETVAL
Now change aria2’s init.d script permission so it can run as executable.
sudo chmod +x /etc/init.d/aria2
Make aria2 run on boot.
sudo update-rc.d aria2 defaults
Now reboot your Raspberry Pi
sudo shutdown -r now
You can always access aria2 on local network using this webgui provided by ziahamza.
To configure the webgui, go to Setting>Connection Setting.
Enter the host, in this case your Raspberry Pi IP address. And your aria2 port which is inside your aria2.conf, in this case 6800.

Troubleshooting:

1. Download was not successful, download directory are external harddrive
Open aria2.conf and change file-allocation=falloc to file-allocation=none