Windows 10 is a great operating system. It has its quirks and annoyances, but what operating system doesn't? Even if you're beholden to Microsoft and Windows 10, you can still shop around. What better way to do that than from the safe confines of your existing operating system and a virtual machine? This way, you can run macOS on Windows, which is perfect when you want to use Mac-only apps on Windows.
In this tutorial, you will learn how to install macOS in a virtual machine, making a virtual Hackintosh. "Hackintosh" is the name of any unsupported hardware running a Mac operating system. Unsure if you will get along with a Mac? Give this tutorial a try!
What Files Do You Need to Create a macOS Virtual Machine on Windows 10?
Before delving into the "how to," you need to download and install the essential tools. The tutorial details how to create macOS virtual machines using both Oracle VirtualBox Manager (VirtualBox) and VMware Workstation Player (VMware Player). Not sure which to use? Learn more about the differences between VirtualBox and VMware.)
Download the latest version of VirtualBox. The tutorial uses VirtualBox 6.0.6.
Download the latest version of VMware Player. The tutorial uses VMware Player 15.0.4.
You also need a copy of macOS, too. Mojave is the latest macOS version. However, at the time of writing, there is no AMD macOS Mojave build available to those without an existing AMD-based macOS installation.
That doesn't mean AMD users are completely out of luck though. You can still install macOS High Sierra in a virtual machine. And in time, an AMD-based macOS Mojave virtual machine build will become available.
This tutorial will focus on installing macOS in a virtual machine running on Intel hardware. Unfortunately, I do not have access to any AMD hardware so cannot provide a tutorial. However, if you continue reading, you will find links to several AMD macOS High Sierra and Mojave tutorials towards the end of the article.
Download the macOS Virtual Image
Download the macOS virtual image for your CPU, virtual machine type, and the version of macOS you want:
Intel Mojave
- VirtualBox Intel HFS Mojave 10.14.3
- Virtualbox Intel APFS Mojave 10.14.3
- VMware Player Intel APFS Mojave 10.14.3
After the file finishing downloading, right-click, and extract using your favorite archive tool. For instance, I would right-click, then select 7-Zip > Extract to "Mojave Image." In the folder, you will find a .VMDK file, which stands for Virtual Machine Disk Format. The VMDK file contains the operating system you will use in the next section.
How to Create a macOS Mojave Virtual Machine with VirtualBox
Open VirtualBox. Select New. Type macOS. VirtualBox will detect the OS as you type and will default to Mac OS X. However, you need to change this. Under Version, select macOS 10.13 High Sierra.

Next, set the amount of RAM the virtual machine and macOS can use. I would suggest a minimum of 4GB, but the more you can give from the host system, the better your experience will be. Remember, you cannot assign more RAM than your system has available, and you need to leave some memory available for the host operating system. (How much RAM does a system need?)
Finally, you need to assign a hard disk. Select Use an existing virtual hard disk file.

Select the folder icon and browse to the VMDK file, then hit Create.
Edit the macOS Mojave Virtual Machine Settings
Before firing up the virtual machine and using macOS Mojave, you need to make a few tweaks to the settings. Right-click you macOS virtual machine and select Settings.
Under System, remove Floppy from the boot order. Ensure the Chipset is set to ICH9.

Select the Processor tab. Assign two processors. If you have an i7 CPU with power to spare (or an i9 with multiple extra cores), consider assigning more. However, this isn't vital. Make sure the Enable PAE/NX box is checked.

Under Display, set Video Memory to 128MB.
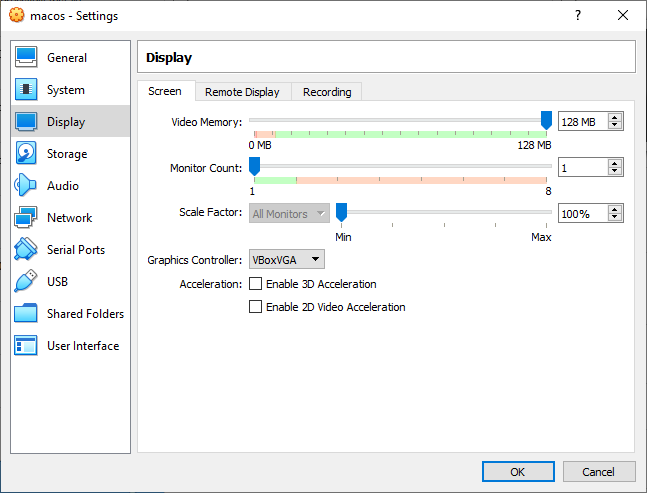
Now, under Storage, check the box alongside Use Host I/O Cache.
Use Command Prompt to Add Custom Code to VirtualBox
Unfortunately, in its current configuration, VirtualBox doesn't work with your macOS VMDK. To get it up and running, you have to essentially patch VirtualBox before the macOS virtual machine will function. TO do this, you need to enter some code using the Command Prompt. All the details are below.
Start by closing VirtualBox. The commands will not execute properly if VirtualBox or any of its associated processes are running. Once closed, press Windows Key + X, then select Command Prompt (Admin) from the menu. If your menu only shows the PowerShell option, type command into your Start menu search bar. Then right-click the Best Match, and select Run as Administrator.
The following code works for VirtualBox 5.x and 6.x.
Use the following command to locate the Oracle VirtualBox directory:
cd "C:\Program Files\Oracle\VirtualBox\"
Now, enter the following commands, one by one. Adjust the command to match the name of your virtual machine. For instance, my virtual machine name is "macos." Here are the commands:
VBoxManage.exe modifyvm "macos" --cpuidset 00000001 000106e5 00100800 0098e3fd bfebfbff VBoxManage setextradata "macos" "VBoxInternal/Devices/efi/0/Config/DmiSystemProduct" "iMac11,3" VBoxManage setextradata "macos" "VBoxInternal/Devices/efi/0/Config/DmiSystemVersion" "1.0" VBoxManage setextradata "macos" "VBoxInternal/Devices/efi/0/Config/DmiBoardProduct" "Iloveapple" VBoxManage setextradata "macos" "VBoxInternal/Devices/smc/0/Config/DeviceKey" "ourhardworkbythesewordsguardedpleasedontsteal(c)AppleComputerInc" VBoxManage setextradata "macos" "VBoxInternal/Devices/smc/0/Config/GetKeyFromRealSMC" 1
After the completion of the commands, and presuming you encountered no errors, close the Command Prompt.

Boot Your macOS Mojave Virtual Machine
Reopen VirtualBox. Double-click your macOS virtual machine to start it. You will see a long stream of text, followed by a gray screen. The gray screen can take a moment or two to clear, but don't panic. When it resolves, you will arrive at the macOS "Welcome" screen.

From here, you can set your macOS Mojave virtual machine up as you see fit.
Pro Tip: Take a snapshot of your virtual machine once it passes the gray screen. If anything goes wrong down the line, you can return to the Welcome screen setup and start the process again. Once you complete the macOS setup, take another one so you can jump straight into your macOS installation. Head to Machine > Take Snapshot, give your snapshot a name, and wait for it to process.
Mouse and Keyboard Not Working?
Turn your macOS Mojave virtual machine off. Now, download and install the VirtualBox Extension Pack.
Once installed, right-click your macOS virtual machine and select Settings. Open the USB tab and select USB 3.0 (xHCI) Controller, then press OK.
Start your macOS Mojave virtual machine again, and you are good to go.
How to Create a macOS Mojave Virtual Machine Using VMware Workstation Player
Prefer VMware over VirtualBox? You can create a macOS Mojave virtual machine using VMware that works exactly the same as VirtualBox. And, just as with VirtualBox, VMware also requires patching before the macOS Mojave virtual machine will work.
Patch VMware Workstation Player
In the "macOS Virtual Image" file list above is the "VMware Player Patch Tool." Before commencing any further, download the patch tool. Then, browse to the location you downloaded the patch tool to. Extract the contents of the archive. This process works best when the folders are on the same drive (e.g., the VMware root folder and extracted archive are both found on the C:\ drive).
Make sure VMware is completely closed. Now, in the patcher folder, right-click the win-install command script and select Run as Administrator. The script will open a Command Prompt window, and the patch-script will run. Pay attention. The script whizzes by and you need to keep watch for any "File not Found" messages.
The most common reason for a "file not found" or a "system cannot find the file specified" message is installing VMware Workstation Player in a different location to the default folder, and executing the patch from a different directory.
Once the patch completes, you can open VMware.
Create the macOS Mojave Virtual Machine With VMware
Select Create a New Virtual Machine. Choose I will install the operating system later. Now, select Apple Mac OS X, and change the Version to macOS 10.14. If you don't see the macOS options, it is because the patch didn't install correctly.

Next, you need to choose a name for your macOS Mojave virtual machine. Choose something easy to remember, then copy the file path to somewhere handy—you're going to need it to make some edits in a moment. On the next screen, stick with the suggested maximum hard disk size, then select Store virtual disk as a single file. Complete the virtual disk creation wizard, but do not start the virtual machine just yet.
Edit the macOS Mojave Virtual Machine Settings
Before you can boot the virtual machine, you must edit the hardware specifications. Plus, you need to tell VMware where to find the macOS VMDK.
From the main VMware screen, select your macOS Mojave virtual machine, then right-click, and select Settings. Like VirtualBox, bump the virtual machine memory up to at least 4GB. You can allocate more if you have RAM to spare.
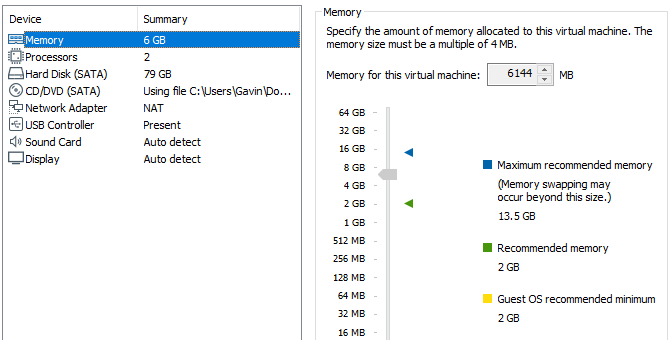
Under Processors, edit the number of available cores to 2.
Now, under Hard Disk (SATA), you need to remove the hard disk created earlier. Select Remove and VMware will remove the disk automatically. Now, select Add > Hard Disk > SATA (Recommended) > Use an existing disk. Browse to the location of the macOS VMDK.
Edit the macOS VMX file
Your final set of edits before switching your VMware macOS Mojave virtual machine on!
Close VMware. Head to the location you stored the macOS virtual machine. The default location is:
C:\Users\YOURNAME\Documents\Virtual Machines\YOUR MAC OS X FOLDER
Browse to macOS.vmx, right-click, and select Open with…, select Notepad (or your preferred text editor). Scroll to the bottom of the configuration file and add the following line:
smc.version = "0"
Save, then Exit.
You can now open VMware, select your macOS Mojave virtual machine, and fire it up!

Install VMware Tools to Your macOS Mojave Virtual Machine
Remember the other ISO file downloaded with the VMware patch tool? That contains the VMware tools, a set of utilities and extensions that improve mouse handling, video performance, and other useful things.
With the macOS virtual machine running, select Player > Removable Devices > CD/DVD (SATA) > Settings. Select Use ISO image file, then Browse to the location of the VM Tool New.ISO file downloaded earlier. Press OK and head back to macOS.

On the desktop, you should note the VMware Tools drive symbol. Double-click the drive to open, then select Install VMware Tools. During installation, you will meet a security warning. Select Open Security Preferences > Allow, then click the Padlock icon to confirm the changes. Restart the virtual machine, and you can start using macOS as you please.
Troubleshooting
There are a couple of things that can (and probably will) go wrong during the macOS virtual machine installation in VMware Player Workstation.
If you cannot see "Apple Mac OS X" during the virtual machine creation wizard, then you need to revisit the patch process. Ensure every process associated with VMware Player is off.
If you receive the message "Mac OS X is not supported with binary translation" when starting the virtual machine, there is a strong chance you need to activate virtualization in your BIOS/UEFI configuration.
If you receive the message "VMware Player unrecoverable error: (vcpu-0)" when starting the virtual machine, you need to head back to the macOS.vmx configuration file to ensure you added the extra line and saved the edit.
macOS Virtual Machine for AMD Hardware
Apple uses Intel hardware to power desktops and laptops. Configuring a macOS virtual machine using Intel hardware is easier because the hardware specifications are very similar. With AMD, the opposite is true. Because Apple does not develop macOS on AMD hardware, creating a macOS virtual machine on an AMD system is trickier.
Adding to this, I don't have an AMD system to test macOS virtual machines on, so cannot give you a detailed tutorial. I can, however, point you in the direction of several macOS AMD virtual machine tutorials that do work, so long as you are patient and follow each step accordingly.
The AMD OS X forum is a great resource for macOS virtual machines. You can find many more forum threads regarding AMD macOS virtual machines, too.
macOS Mojave Virtual Machine Installation Complete
You have two options to choose from for your macOS Mojave virtual machine. Both options are great if you want to give macOS a try before making the switch from Windows. You can also use a macOS to some of the best Apple apps on offer.
You can use a virtual machine to test other operating systems too. For instance, here's how to install a Linux distro in a virtual machine. Looking to learn more about virtual machines? Check out our VirtualBox User's Guide, which teaches everything you need to know.
How to Install Linux in Windows With a VMware Virtual Machine How to Install Linux in Windows With a VMware Virtual Machine Do you want to install Linux, but can't leave Windows? Try a virtual machine to run your favorite version of Linux inside Windows. We show you how to set up VMware Workstation Player. Read More
Explore more about: Emulation, Operating Systems, Virtual Machine, Windows 10.